| Birthday Year Calendar Project for Kids |
|---|
| Everything Kids Need to Know to Create an Inexpensive, Yet Fun and Educational, Birthday Year Calendar |
| www.studenthandouts.com ↣ Kindergarten ↣ Kindergarten Arts and Crafts |
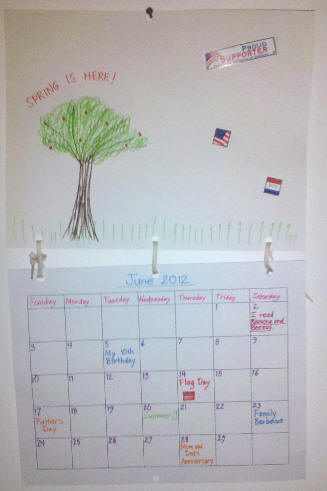 What is a birthday year calendar? What is a birthday year calendar?A birthday year calendar is a calendar that starts in the month of a person's birthday, rather than in January. What is a birthday year calendar for? A birthday year calendar is, at its most basic, a countdown until the person's next birthday. It is also a way of setting goals. Instead of looking back on a calendar year, like 2024, and discussing and comparing what each person in the family or classroom accomplished, a birthday year calendar allows a child (or adult) to chart more personal goals and accomplishments without creating competition among classmates or siblings. Birthday year calendars also make terrific homemade gifts for family members (gifts that are practical and useful for the recipients, as well as worthwhile educational experiences for the kids giving them). Here (right) is a sample of what the project should look like. We goofed and forgot to put a "30" in the last box...oops! This proves the point that you must be certain to check the kids' work. We recommend having the kids write their numbers in regular pencil first, in case they accidentally skip a number or make another miscalculation. Once they have done everything correctly in pencil, they can go back over it using markers or colored pencils. Each calendar should take about a week or two to complete. We recommend dividing up the phases of the project. For example, you can do one month per day. You might instead fill in the days of the week, numbers, etc., on all of the sheets first, saving the drawing for last. If you have the kids devote an hour per day to this project, they should have it completed in about two weeks. Supplies: 13 sheets of standard white computer paper Colored pencils or markers String or ribbon Hole-puncher Additionally, you will need a computer printer to print out 12 of the blank calendar sheets, available here. If you have sturdier card stock paper available, you may want to use a piece for the cover sheet, and maybe include an extra piece at the back of the calendar for sturdiness and durability. Age range for this project: This birthday year calendar project is most appropriate for students in grades two through four. If you are doing this project with kids of different ages, you might want to consider giving the younger children calendar sheets that already have the days of the week and numbers on them (available here). Educational goals of this project: Kids gain experience creating a calendar, seeing how calendars are designed and laid out. Kids practice spelling/writing the names of the month, organizing the order of the months, and writing numbers. Kids gain a sense of time and sequence by writing down the dates of important events and holidays. Kids use their calendars to begin learning how to set and chart realistic goals. Kids gain a sense of accomplishment as they are able to look back and see what projects they have completed and what goals they have met. Directions: (1) Print off 12 copies of the 100% blank calendar. (2) Have the kids complete each calendar sheet with the name of the month, dates of family members' birthdays, anniversaries, etc. (3) Use a hole-punch (or a three-hole punch) to punch three holes at the top of each calendar page. Then punch a hole at the bottom center of each page. Include a blank piece of paper at the top of the stack (this will be the cover). (4) Use loosely-tied ribbon or string to bundle the pages together at the top. Place the birthday person's birthday month on top as the first page after the cover. (It should look like a three-ring binder, but with ribbon/string instead of metal rings.) You should end up with what looks like a handmade, flippable wall calendar. (5) Now that it's easy for the kids to see what blank side of paper will be above each month page, have the kids decorate these blank sides of the paper with a theme that corresponds to the month below. They can draw, cut and paste photos, or whatever they'd like. You may want to leave the string/ribbon untied as kids color and decorate the pages, to avoid tears. Using the calendar: If your kids are giving this calendar as a gift, have them include dates and events that are meaningful to the recipient. If your kids are using this calendar to chart their own birthday year, have them give it a title such as "My Tenth Year." As the child completes reading goals, finishes important projects, etc., have him/her write these things down on the calendar. Your child may even decide to leave the "decorating pages" of the calendar blank in order to fill these with photos and memorabilia throughout the year. As the child's next birthday approaches, and he or she is getting ready to create a new birthday year calendar, the child may want to laminate and preserve the old calendar as a kind of scrapbook keepsake of the previous year. |
 |  |  |  |  |
| www.studenthandouts.com ↣ Kindergarten ↣ Kindergarten Arts and Crafts |

